|
|
|
| [ PaintSkinWeights 1.2 ] |
|
[ NEW UI AND ADDED / IMPROVED FUNCTIONS ] [ SELECTIONS, VIEWPORT ACTIONS AND ONE CLICK MANAGEMENT ]
[ TIPS AND TRICKS ] [ TUTORIAL ] [ DOWNLOAD ] |
|
Maya's character setup lacks perfection in many areas. One of the most problematic processes ( in my opinion of course ) is the skin weights painting.
The default toolset itself is powerfull and flexible enough, but somehow the workflow is not that strightforward as could be, i mean - too many extra clicks
and actions for nothing.
There are many solutions trying to improve that, but I can't see them as part of the overall Maya's workflow. They seem to me
like islands in ocean.
Why that, after long thinking of what and how can be improved i decided to hack the default toolset. The main advantage of this new
workflow is that we move the focus from browsing endless lists with skinInfluences to direct - one click manipulations
in the viewport, while Maya continuing to pass the same data along as the traditional tool while presenting the user with a cleaner, more flexible
toolset focused on the task at hand. |
| [ TOP ] |
|
| [ NEW UI AND ADDED / IMPROVED FUNCTIONS ] |
| |
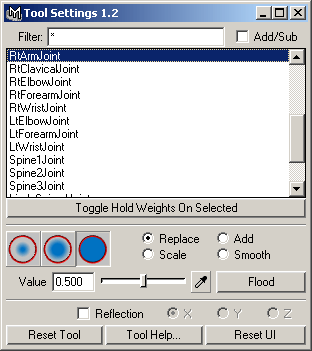 |
As you can see, the "Tool Settings" window is mutch smaller than the original one and contains some new elements.
Filter - using it, we can filter skin influences in the list below. For example, if i write inside the filter field something like *Rt* *Spine*, this will display only those skin influences, having "Rt" and "Spine" strings inside their names.
The filtering is one of the key functions in this toolset, it affects all other commands, because they can be executed only over the visible items in the skin influence list.
In addition, for some of the most lazy of us, we can use RMB over the textField for fast reset of the filtering string.
Add/Sub - this checkbox is controlling the filtering's behaviour.
If it is checked, then the filtering is additive - items will be added to the skin influence list.
If it is unchecked, then the behaviour is substractive - items will be removed from the skin influence list.
We are not forced all the time to browse in the
|
|
skin influence list trying to find the needed skin influences. All the selections and other manipulations can be done using marking menus directly in the viewports.
We have a little trick here - double click over item in the skin influence list will open the Attribute Editor and will focus it over the selected item ( it will show the skin influence attributes - read TIPS AND TRICKS area below to find more information about that ). In this way, we can change translation, rotation, scale and any other attribute of the selected skin influence without leaving the paint skin weigts mode. This allows to test how the skin influence is affecting the skinGeo and immediately to repaint the skin weights.
Under the influence list are located some of the common Artisan brush controls. Please notice that, if "Replace" or "Smooth" mode are selected, then Max Value = 1.0. If "Add" or "Scale" mode are active, then Max Value = 1.5. In fact i never use "Scale" and "Smooth" modes, because they are messing-up the skin weights.
Please notice that default button "Close" ( in the bottom-right corner ) is replaced by "Reset UI" button. It allows fast and painless return to the Maya's default menus and workflow. |
| |
|
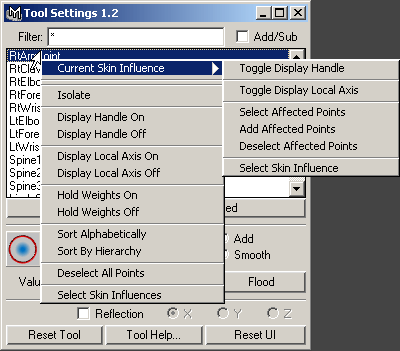 |
Holding of RMB in the skin influence list will open a menu with some of the main features:
Isolate - this command will isolate selected skinGeos and their skin influences in the viewports. With other words - it will hide the rest of the objects and you will see only your currently selected skinGeos + their skin influences. In this way you can optimize your performance / workflow organization, because in many cases we have complicated multilayered characters ( example: body, clothes, accessories, bunch of other stuff on top of each other ... ). With the "Isolate" functiontion you can see and work only over selected by you elements.
Display Handles On / Off - this command will show / hide the Display Handles for all visible items in the skin influence list. These Display Handles allow direct
|
|
selection of the skin influences in the viewports using single RMB click over them. Maya offers something similar but if our character have 3-4 layers of joints ( for example: IK, FK, blend, skin layers on top of each other ), then the software cant recongnize which one is the needed skin joint. Pay attention that we can offset the Display Handle of any transform node, in this way we can easily manage overlaping in the space skin influences.
Hold Weights On / Off - nothing extraordinary here, just autmation for holding on / off the weights for all visible items in the skin influence list.
Deselect All Points - deselects all vertices / CV's and returns the focus over the hilited / selected skinGeos.
Also there are some commands affecting only the currently selected item in the skin influence list:
Toggle Display Handle and Toggle Display Local Axis nothing to explain here - just show / hide Display Handle and Local Axis.
Select Affected Points - using this command we can select those skinGeo vertices / CVs affected by currently selected items in the skin influence list. In this way we can limit the skin weights painting to chosen only vertices / CVs. This will make the "Smooth" and "Flood" commands less destructive and the overall process will be safer.
Add Affected Points - this command adds vertices / CVs to the current selection. In this way we can combine vertices / CVs affected by different skin influences.
Deselect Affected Points - deselects affected vertices/ CVs weighted to thecurrently selected item in the skin influence list. |
| |
|
| |
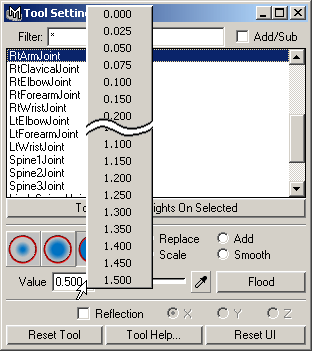
| Holding of RMB over the "Value" slider opens menu with predefined brush values. No more annoyng writing of values by hand :) |
|
|
| |
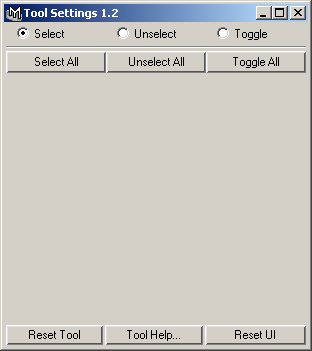
| In addition we have optimized PaintSelectionTool menu. All the unusefull stuff is blowed away. |
|
|
|
| [ TOP ] |
|
| [ SELECTIONS, VIEWPORT ACTIONS AND ONE CLICK MANAGEMENT ] |
| |
| MARKING MENU FOR SKINED GEOMETRY |
| |
The first step for workflow optimizations is to eliminate the extra clicks.
Regarding this, we have something that allows us fast identification and easy selection of skined geometry and skin influences directly in the viewports. Lets take a look what we have in the arsenal: |
| |
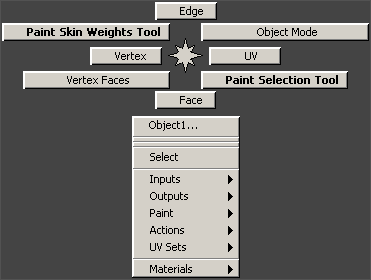 |
When RMB is pressed in the viewports, if the mouse pointer is placed over skined geometry, we will have 2 extra options in the marking menus.
The NW and SE boxes allow fast activation of paintSkinWeightsTool and paintSelectionTool.
Please notice that these commands work with multiple selections. For example, if we execute these commands when we have, to say, 10 selected skined objects, then all of them will be available for skinWeights / selection painting. Also these commands are additive, they are adding new objects to the current selection. If you want to work only with single object, just release again RMB and execute "Select" command - this will deselect all the objects, except the first one under the mouse cursor. |
|
| |
| Note: use the paintSelectionTool only to select vertices ( for polygonal geometry ) or control points ( for nurbs geometry ). Only they can interact with the paintSkinWeightsTool. |
|
| |
| MARKING MENU FOR SKIN INFLUENCES |
| |
 |
The fastest way to select a skin influence is to use right mouse click over it in the viewports. If at this time the Attribute Editor is opened, it will be focused over the selected skin influence ( it will show the skin influence attributes - read TIPS AND TRICKS area below to find more about this ). As i mentioned above - in this way, we can change translation, rotation, scale and any other attribute of the selected skin influence without leaving the paint skin weigts mode. This allows us to test how the skin influence affects the skinGeo and immediately to repaint the skin weights.
|
|
|
|
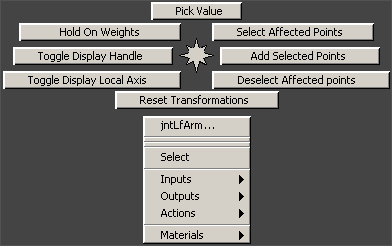
Holding of RMB over a skin influence in the viewports will show a marking menu with commands specific for that skin influence.
Pick Value - shortcut to the color picker, it is very usefull to have ability for fast picking of brush values.
Reset Transformations - in one well designed rigging system the skin influences are zeroed-out( translation, rotation, scale, shear, whatsoever = 0 ). Because of that is usefull to have some tool that allows fast returning of skin influence to the origin state ( = 0 ). Never use this command, if your skin influences are not zeroed-out.
Hold Weights, Toggle Display Handle, Toggle Display Local Axis, Select Affected Points, Add Selected Points, Deselect Affected Points - these commands have been explained above.
|
|
| [ TOP ] |
|
| [ TIPS AND TRICKS ] |
| |
There is a little trick with the Attribute Editor: if we hold CTRL + LMB/MMB/RMB over any attribute and move the mouse, this will change the attribute value exactly in the same way as we can do it with MMB in the Channel Box. it is not a good idea to use the Channel Box, because this will deactivate the paint skin weigts mode. Please notice that CTRL+LMB/MMB/RMB is cnanging the attribute's value with different increment ( LMB -> +- 0.01, MMB -> +- 0.1, RMB -> +- 1.0 ). There is no longer need to write values by hand. Also, dont forget the "Reset Transformations" command inside the marking menu ( holding of RMB over a skin influence in the viewports ).
===
Very stable skinning workflow is first to bind the geometry to the skin influences using "Bind Method" set to "Closest Joint" ( this option is located inside the "Smooth Bind Options" dialog box ) and then to start distributing the skin weights with solid brush in "Replace" and "Add" only painting modes, with small brush values ( bethween 0.025 - 0.5 ). This process is little bit slower, but works fine in any case. Using it, we will never produce small weights and our skined geometry will be very stable.
The common issue of the small weights: move the character far from the world's origin and if the skin clusters contain small weights, then the deformations will be bad - streched geometry, popping vertices, etc. Many times the "Prune Small Weights" command cant "chop" properly the small weights and we will be forced to fix them by hand.
These small weights are produced mainly by "Smooth" / "Scale" painting modes and the "Flood" command - stay away from them.
===
Many people cant understand what a powerfull tool the sculpt deformers are. By default all their options are little messy, but after few changes we can turn them to a nice solution for preserving body volume, create skin sliding effect and many other usefull or useless things.
The key i think is to use a secondary nurbs surface as scupt deformer. In this way we will have the flexibility to change the shape of the deforming geometry, instead of struggling with the default sphere used as sculpt. Of course, this additional flexibility comes on it's price - slower performance. it is up to you to decide what you need, based on a particular case.
Few ideas:
- couple of Maya versions ago i had serious problems using sculpts in "Stretch" mode, this was especially noticable when the sculpt deformer was far from the world origin. I cant reproduce these issues in the recent versions of Maya, so i consider they are fixed - yay !
- the "Stretch" mode creates a nice fleshy looking deformations. For example, you can use it successfully in cases where the skin is not only sliding over the muscles, but is also dragged by them. Also, this is the slowest of the three modes of the sculpt deformer.
- i would say to use the sculpts mainly in a "Flip" mode - it is very fast and creates nice sliding effect. This mode in combination with geometry based skinInfluences are producing very similar results to those created by sculpt in "Stretch" mode.
- to achieve good fleshy result when using the "Flip" mode, set "Envelope" to some small value ( 0.1 - 0.5 ) and set "Maximum Displacement" to some big value ( to say, 1 - 5, or more );
- use drivenKeys to manipulate the "Envelope" attribute regarding base-target poses;
- remove all unaffected by the deformer geometry points from the deformer set(s) to improve the performance - actually this rule is important for all the deformers - better keep it in mind all the time.
===
Use some attribute collector script to collect and manipulate all the needed attributes ( tx, ty, tz, rx, ry,rz, sx, sy, sz, etc. ) of the rig handles ( for example - ForeArmMover, WristMover, PelvisMover, etc. ). This gives the ability to manipulate the rigs and to put them in different poses without even leaving the paint skin weights mode.
|
| |
|
| |
Review of several important hotkeys. Some of them are default ones, some are custom.
Artisan Paint Tools ( paint skin weights mode, paint selection mode, paint attribute mode, etc. ):
b + MMB -> changes the brush radius;
n + MMB -> changes the brush value;
ALT + c -> toggle color feedback ( this one is specific for all any paintWeightsCtx );
ALT + r -> toggle reflection painting;
ALT + a -> toggle wire;
Attribute Editor:
CTRL + LMB ( scrolling over attribute ) -> changes the attribute value with increment of +- 0.01;
CTRL + MMB ( scrolling over attribute ) -> changes the attribute value with increment of +- 0.1;
CTRL + RMB ( scrolling over attribute ) -> changes the attribute value with increment of +- 1.0;
Outliner:
SHIFT + LMB -> expands / colapses the hierarhy;
Custom hotkeys ( in my opinion they are very usefull for skinning purposes ):
ALT + w -> toggle wire
// code =============================================
string $panel = `getPanel -underPointer`;
if ( size ( $panel ) != "" )
{
if ( `modelEditor -q -wos $panel` == 0 )
{
modelEditor -e -wos 1 $panel;
}
else
{
modelEditor -e -wos 0 $panel;
}
}
//=================================================
ALT + i -> isolate selected
// code =============================================
string $panel = `getPanel -underPointer`;
if ( $panel != "" )
{
if ( `isolateSelect -q -state $panel` == 0 )
{
enableIsolateSelect $panel 1;
isolateSelect -state 1 $panel;
}
else
{
enableIsolateSelect $panel 0;
isolateSelect -state 0 $panel;
}
}
//=================================================
ALT + x -> toggle xray
// code =============================================
string $panel = `getPanel -underPointer`;
if ( size ( $panel ) != "" )
{
if ( `modelEditor -q -xray $panel` == 0 )
{
modelEditor -e -xray 1 $panel;
}
else
{
modelEditor -e -xray 0 $panel;
}
}
//=================================================
ALT + e -> wireframe on shaded
// code =============================================
if ( `displayPref -q -wsa` == "full" )
{
displayPref -wsa "reduced";
}
else if ( `displayPref -q -wsa` == "reduced" )
{
displayPref -wsa "none";
}
else if ( `displayPref -q -wsa` == "none" )
{
displayPref -wsa "full";
}
//=================================================
ALT + t -> affected highlighting
// code =============================================
if ( `displayPref -q -displayAffected` == 1 )
{
displayPref -displayAffected 0;
}
else if ( `displayPref -q -displayAffected` == 0 )
{
displayPref -displayAffected 1;
}
//================================================= |
|
|
| [ TOP ] |
| [ TUTORIAL ] |
|
|
| [ TOP ] |
|
[ DOWNLOAD ]
Note: The archive contains versions of PaintSkinWeights for Maya 6.5, 7.0, 8.5.
If you are using Maya8.5, please dont forget to take a look at the included readme.txt file!
I included and one additional script - attributeCollector. It does exactly what the name says - collects attributes from different nodes in it's own UI panel.
This can be very usefull when skinning a character, because multiple nodes can be manipulated at once, without even leaving the attribute skin paint context.
Last updated on 22/02/2007 |
|
|
|